


Simplified Guide on How to Add a Watermark in Photoshop
Nowadays, adding a watermark is becoming significantly essential. With so many people sharing and grabbing digital content online, it’s easy for your work to be reposted without credit. A watermark helps protect your content by showing that it’s the original and owned by you.
Now, if you’re using Photoshop and wondering if you can add a watermark to a video using it? Well, yes! With Photoshop, you can add a watermark to your video using the Timeline panel. While it’s mainly an image editing tool, this tool does support basic video layers, which allows you to overlay your watermark throughout the entire video clip. Just keep in mind that it’s ideal for short and light edits. If you’re working with longer or more complex videos, using a dedicated video editor might be more efficient.
In this guide, we’ll guide you on how to add a watermark in Photoshop, so let’s get started!

Part 1. How to Create a Watermark in Photoshop?
With Photoshop, you can easily create any watermark that you want. It is a great tool to ensure that you can easily apply them to your digital content anytime you want. Below is the step-by-step guide on how to create a watermark in Photoshop:
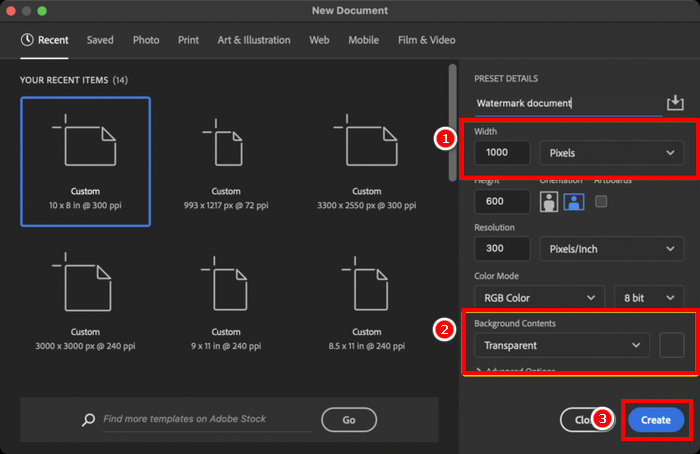
Step 1. Open your Photoshop, create a new document with a transparent background. It is best when the document size is 1000 px wide. Once set, click the Create button below.
Step 2. Use the Type Tool to type your name or brand for a text watermark, or use the Brush Tool to draw your signature. Set the color to white.
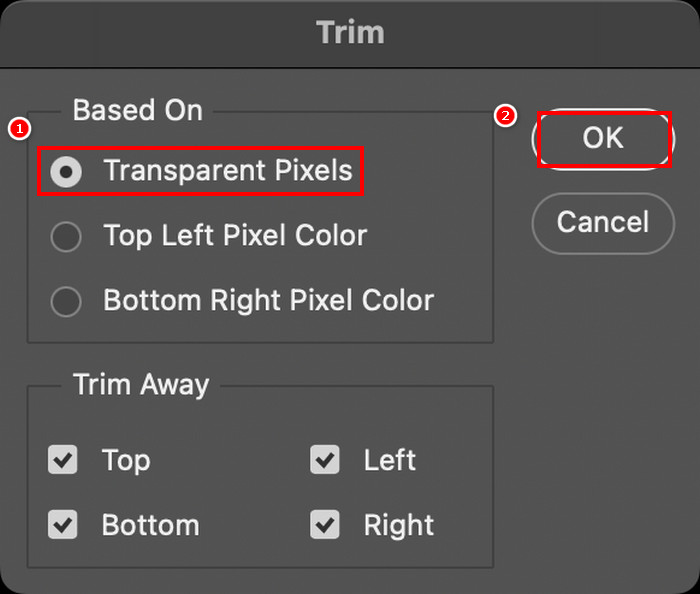
Step 3. Go to the Image tab, select Trim, choose Transparent Pixels, and click OK to remove extra space.
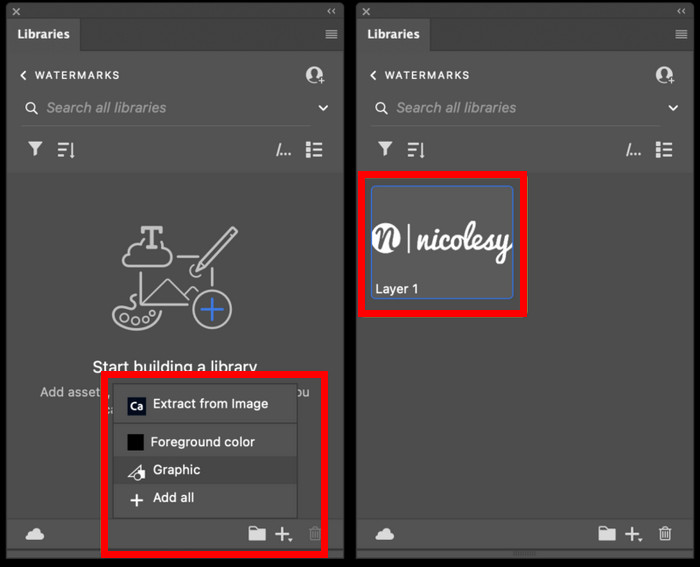
Step 4. After that, open the Libraries panel, click Create New Library, name it, and click Create.
Step 5. Click the + icon in the Libraries panel and choose Graphic to save your watermark for easy access anytime.
This is just one way to create a watermark in Photoshop, but you have the freedom to design it however you like, whether it’s a bold logo, a subtle signature, or a simple name. The key is to make it uniquely yours and ready to use whenever you need to protect your content.
Part 2. How to Add a Watermark to Video in Photoshop?
Now that you know how to create a watermark in Photoshop, it’s time to put it to use. In this part, we’ll show you how to add your watermark to a video using Photoshop’s basic video editing tools. While Photoshop isn’t a full video editor, it can still handle simple tasks like overlaying a watermark. But take note that Photoshop is not suitable for beginners because of its complex interface that might drown users who are not used to it. To properly guide you, follow the step-by-step process below:
Step 1. If you don’t have Photoshop on your computer, download and install it first. Take note that this software is available for both Windows and macOS.
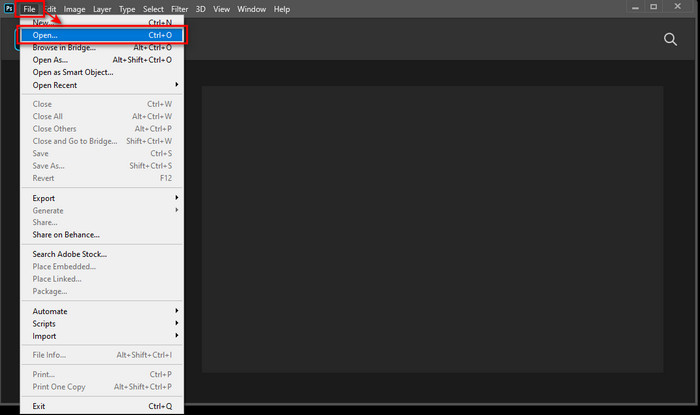
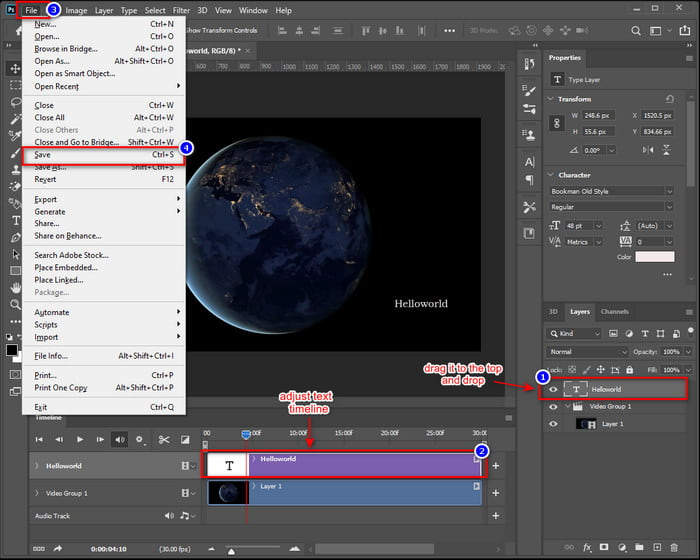
Step 2. In your Photoshop again, go to the File tab and click Open. After that, locate and choose the video that you want to add a watermark to. After adding the file, there will be a Timeline.
Step 3. After that, on the left side panel of the interface, locate the T icon for the Text tool. Click anywhere on the video to start typing the text you want to use as your watermark. Before moving on, feel free to adjust the font style, size, color, and other settings to customize how your watermark looks.

Step 4. In the Layers panel, drag the Text layer above the Video Group to make sure it appears on top of the video. Then, go back to the Timeline panel and adjust how long the text appears by dragging its start or end point. Once you’re done, go to the File menu and click Save to keep your changes.
With Photoshop, you can indeed add a watermark to a video using it. The thing is, it’s not for everyone. The learning curve is so steep that beginners might find the interface overwhelming. If you’re not familiar with how layers, timelines, and text tools work in Photoshop, it can take some time to get used to
Part 3. How to Add an Image Watermark to a Video in Photoshop [Ultimate Way]
Since Photoshop is not beginner-friendly when it comes to adding a watermark to a video, there are alternative tools that users can try. FVC Video Converter Ultimate is the way to go. This converter tool does not just convert videos and audio. Also, it can be used to add an image watermark to a video.
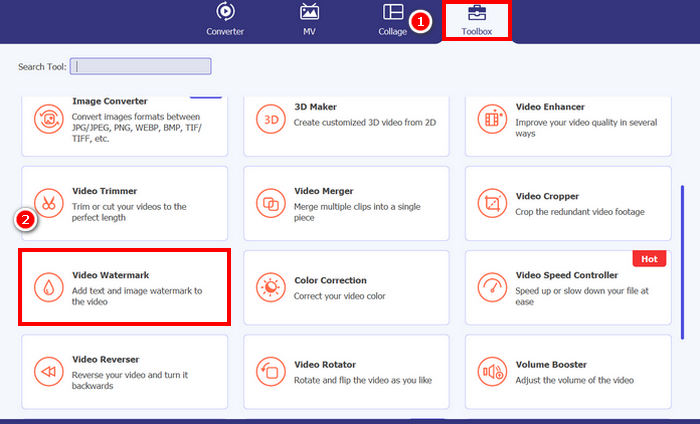
FVC has a Toolbox where you’ll find various helpful features, and Video Watermark is just one of them. With this tool, you can easily upload your video, add your image watermark, and position it wherever you want on the screen. No complicated layers or timelines, just a simple and user-friendly interface that gets the job done quickly. It’s perfect for those who want fast results without the steep learning curve of Photoshop. Below is the step-by-step guide on how to add an image watermark to a video in Photoshop with FVC.
Step 1. First, you need to download and install the FVC Video Converter Ultimate on your computer. Please note that it is compatible with both Windows and macOS.
Free DownloadFor Windows 7 or laterSecure Download
Free DownloadFor MacOS 10.7 or laterSecure Download
Step 2. Launch the tool, click on the Toolbox tab, and from there, select Video Watermark.
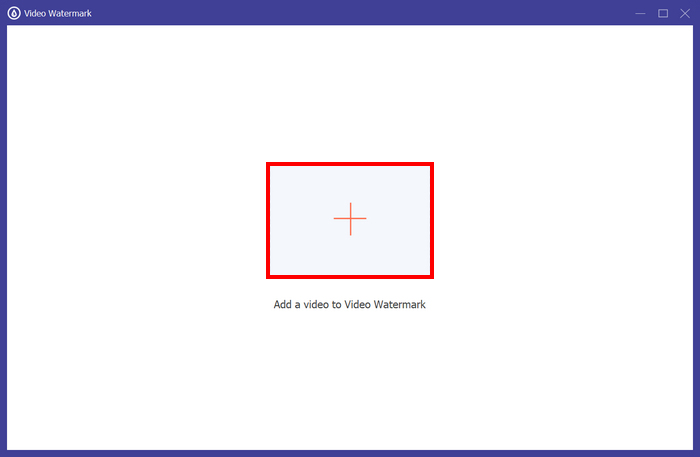
Step 3. After that, click on the Add a Video to Video Watermark and select the video that you want to add an image watermark to.
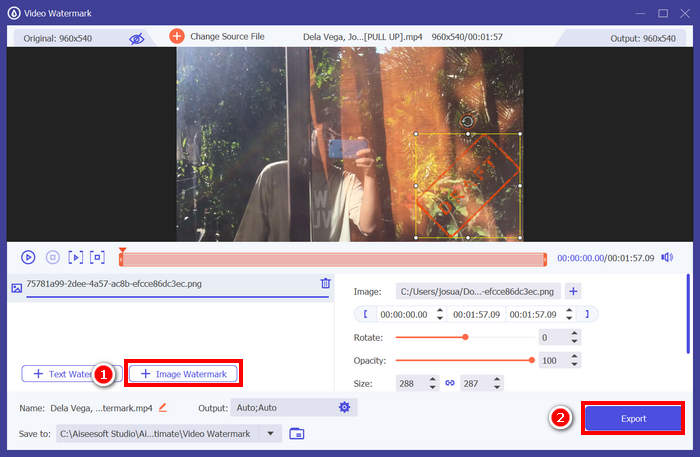
Step 4. Now, choose + Image Watermark to add the image that you want to use as a watermark for your video. From there, you can adjust it. Once done, click the Export button.
See, with the Video Watermark tool of FVC Video Converter Ultimate, you can easily add an image watermark to a video. It’s indeed for everyone, even beginners. The process is straightforward. You just need to upload your video, insert your watermark, adjust its size and position, and you're done.
Click here to learn more about how to remove video’s watermark if needed.
Part 4. FAQs about Adding a Watermark in Photoshop
Is it okay to add a watermark?
Yes, adding a watermark is a common and acceptable way to protect your content. It is helpful in terms of giving identities to your digital content, where content grabbing is prevalent.
Is Photoshop beginner-friendly for adding watermarks to videos?
Not really. While Photoshop can add watermarks to videos, its interface and video editing workflow can be complex for beginners. It’s better suited for users already familiar with layers and timelines.
Can I customize the appearance of my watermark in Photoshop?
Absolutely. Photoshop gives you complete control over your watermark’s font, size, color, opacity, and placement, whether it’s text-based or image-based.
Conclusion
Now that you know how to add a watermark in Photoshop, understanding its relevance is also important. Adding a watermark in Photoshop is a helpful way to protect your video content and establish ownership. While the process may seem complex at first, especially for beginners, Photoshop offers the flexibility to create and apply custom watermarks with precision. And if you're looking for an easier alternative, tools like FVC Video Converter Ultimate provide a more straightforward option. What are you waiting for? Let’s get started!
-
 5 Ways to Remove a Watermark from a Video in a Professional Manner
 Need to remove a watermark from a video to make it look professional? Well, read this article as we add a tutorial on how to do it!
-
 2 Great Apps You Can Use to Remove Watermark From MP4 Videos
 This article will offer you simple and easiest ways regarding on how to remove the watermark from the MP4 videos using your devices like Windows and Mac
-
 Remove Animotica Watermark on Exported Videos with 3 Proven Ways
 Have you ever wondered if it is possible to remove the Animotica watermark on videos you exported? This article provides a how-to-do.