

Learn How to Trim a Video in Adobe Premiere [2024]
When editing a video, it’s very common to handle clips with lengthy footage that may contain unnecessary parts that need to be removed. Also, there are instances when we need to send a certain part of the video, so we end up trimming some part of it.
The good news is there’s a tool that makes this process simple. Adobe Premiere allows its users to select, trim, or cut specific portions of their videos with precision. In that way, regardless if you're trimming down to meet a time limit or cutting out distractions, this video editing tool can easily make it happen. Now, in this simplified guide, you have the opportunity to learn how to trim videos in Adobe Premiere. What are you waiting for? Continue reading!

Part 1. What is Adobe Premiere
Adobe Premiere is a well-known professional video editing software developed by Adobe Systems. It was first introduced in the year 1991, and from then on, it quickly became popular due to its powerful features.
Today, Adobe Premiere is part of the Adobe Creative Cloud suite, and it remains one of the leading video editing programs used across the industry by various skilled video editors. With this video editing tool, users can able to trim, merge, add effects, organize video clips, and more.
Why Use Adobe Premiere to Trim Videos?
Using Adobe Premiere to trim a video is a great solution if you’re dealing with lengthy videos to cut out unwanted sections. With its Razor feature and timeline markers, you can easily trim videos down to the exact frame, ensuring smooth edits and a polished final product. Lastly, it gives you the control to make clean and professional cuts quickly.
Part 2. Trim a Video in Adobe Premiere [Simplified]
Trimming videos in Adobe Premiere is very simple and efficient. It lets users easily cut out unwanted parts of their lengthy video clips. Below is the guide on how to easily trim a video in Adobe Premiere:
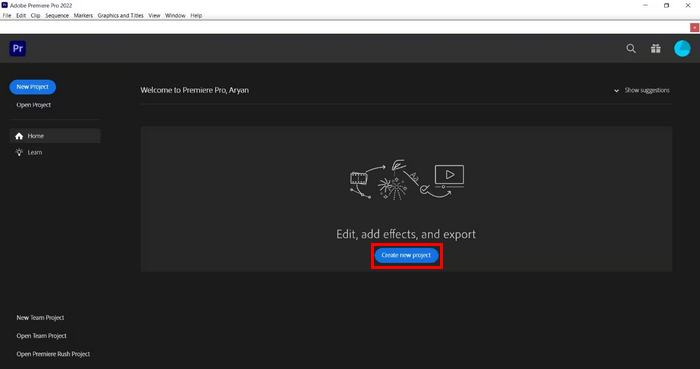
Step 1. First, on your Adobe Premiere, you need to create a new project.
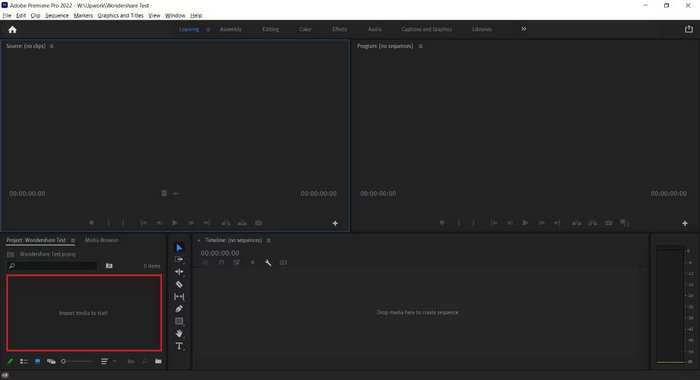
Step 2. Next, import the video file that you want to trim by clicking the Import Media to Start below.
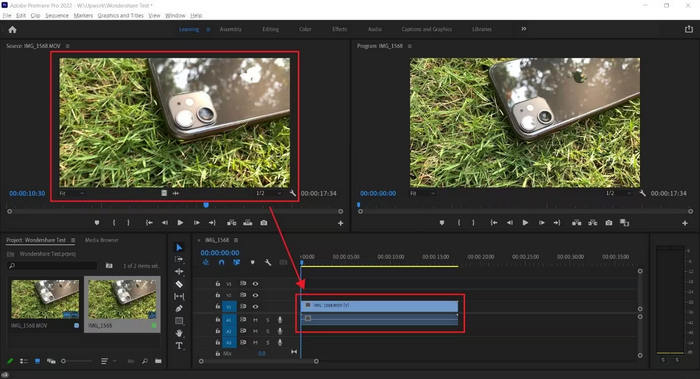
Step 3. After that, select either the video you’ve imported from the Source Window and easily drag it into the Timeline.
Step 4. Now, click on the video you want to trim from your Timeline and select the Razor Tool. Now, choose the point or the part where you want to start the cut and confirm it with your left mouse button.
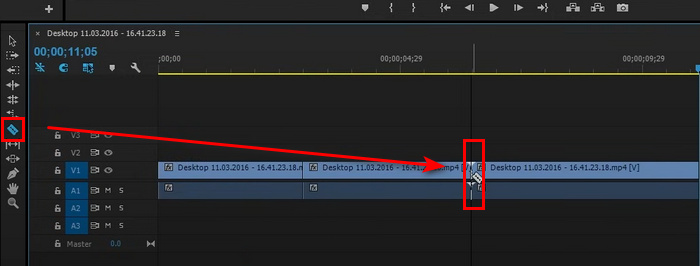
Tip: You can also select the Razor Tool by pressing C on the keyboard.
That’s it! You have your video trimmed now with the help of the Adobe Trim Video feature. It is indeed true that with this video editing tool, you can easily and precisely cut a video. So, if you’re working with lengthy and big video clips, it’s now a piece of cake for you to cut out unnecessary parts of them.
If you’re interested in Adobe Premiere Pro, click here to learn more of speeding up a video with it.
Part 3. Adobe Premiere Trim Video’s Best Alternative
While using Adobe Premiere to trim a video is a great method to precisely cut unwanted parts, others may find it expensive to purchase if it will solely be used for its video trimming feature. If you’re looking for something less expensive but that offers the same quality as a video trimmer, Aiseesoft Video Converter Ultimate is the best for you.
This all-in-one video converter tool offers an array of features that can cater to most video editing needs of users. It has a dedicated Video Trimmer tool that can easily trim videos without the complexity of more advanced software. Moreover, it allows you to select the start and end points of your video clips for easier trimming.
Main Features:
• Manual input option to trim the start and end times of the video segment.
• Allows multiple segments to be added to trim different parts of the video.
• Quickly splits the video into segments for faster editing.
• Preview the trimmed video with play, pause, and frame-by-frame navigation.
• Merge multiple trimmed segments into a single file.
Here’s how to trim a video in Aiseesoft Video Converter Ultimate:
Step 1. First, download and install the Aiseesoft Video Converter Ultimate on your computer device.
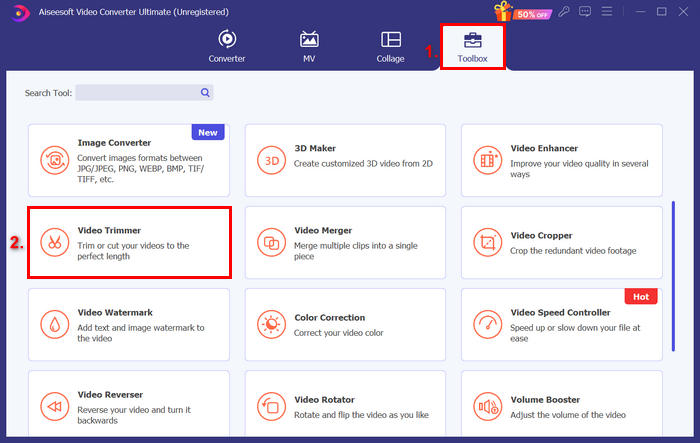
Step 2. Launch the tool, go to the Toolbox tab, and choose Video Trimmer.
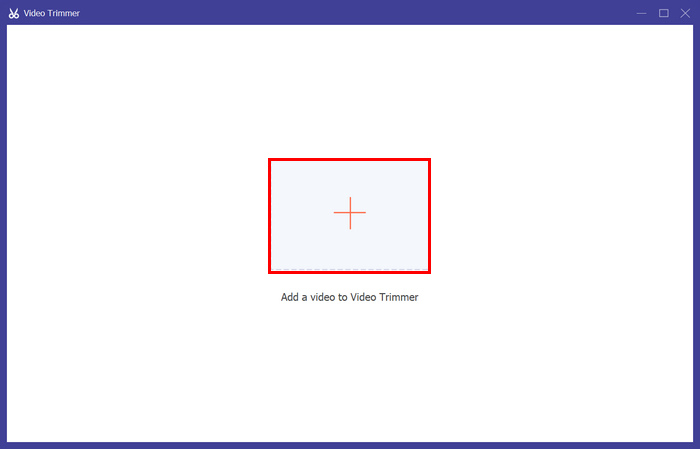
Step 3. Click on the Add a Video to Video Trimmer to add the video that you want to trim.
Step 4. After that, move the start and the end of the clip by dragging, moving it from left to right, or typing in the start and end times of the part of the video that you want to trim. Once done, click on the Export button below.
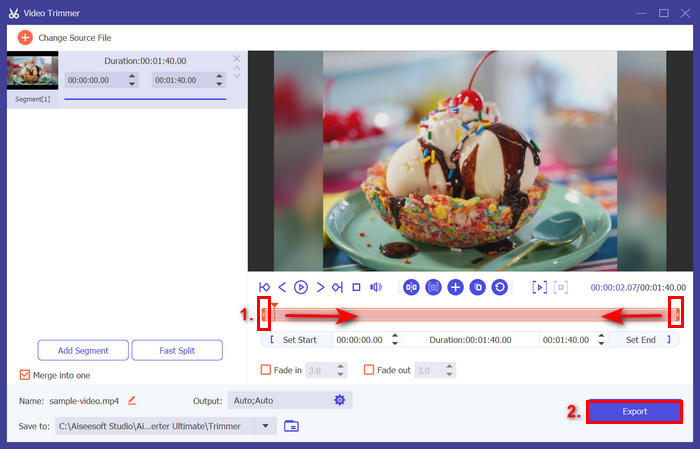
Tip: If you want to trim the video, use the Fast Slip trimmer feature. You just need to click on the Fast Slip button beside the Add Segment button. Next, select a mode in which you want to split the segment. If you choose to split it by average, then just indicate the number, but if you want to split it by time, then indicate the time. After that, click the Split button.
Aiseesoft is also good at trimming audio files like MP3.
Part 4. FAQs about Trimming Video in Adobe Premiere
How do I make precise trims in Adobe Premiere?
Adobe Premiere offers several tools to make your trims precise. One method is using the Source Monitor to set the in and out points before you add the clip to the timeline, which gives you better control over where the clip begins and ends. For even more accuracy, you can zoom in on the timeline using the Zoom Slider to focus on specific frames.
Is it possible to undo a trim or restore trimmed footage in Adobe Premiere?
Yes. You can easily undo any trimming action by pressing Ctrl+Z if you’re using Windows or Cmd+Z if you’re using a Mac. If you accidentally trim too much or remove the wrong section, you can use the Undo command multiple times to revert your changes. Additionally, if a portion of the video is trimmed but not completely removed, you can simply drag the edges of the clip back out in the timeline to restore the trimmed footage.
Can I trim multiple clips at once in Adobe Premiere?
Yes. Adobe Premiere can trim multiple videos simultaneously. Simply select the clips you want to adjust in the timeline, and then use the Ripple Edit tool or the timeline markers to trim them all at once. This is helpful when you need to apply consistent trimming across several clips.
Conclusion
Learning how to trim a video in Adobe Premiere is now an integral part of our digital life, especially when dealing with long videos. Now, if you have this software app on your computer device, you can take advantage of it, if none, you can try the Aiseesoft Video Converter Ultimate to attend to your video trimming needs.
-
 11 Remarkable Video Trimmers to Use [Free and Paid]
 Here are the lists of video editing software you can use to trim a video. We will genuinely review these programs and provide all the details you seek.
-
 3 Excellent Methods on How to Trim Video on Android
 Do you want to use your Android device to cut a video? Then this post is for you. We will discuss valuable ways about how to shorten a video on Android.
-
 How to Trim A Video with TikTok [Detailed Instructions]
 Do you want to know how to shorten a video with TikTok? Then, we will provide easy ways. Also, you will learn other methods using offline applications/programs.