

Detailed Guide on How to Remove Watermark in Photoshop
Photoshop is a powerful photo editing tool, known for its comprehensive features that are best for casual and professional use. Now, if you’re wondering if the tool also supports removing watermarks from photos, the answer is yes. Photoshop is more than capable of removing watermarks using its range of retouching tools. These tools enable users to effectively remove unwanted text, logos, or overlays from images. In this guide, learn how to use these tools in Photoshop to remove watermarks in photos. Also, don’t miss the chance to discover its best alternative. Let’s dive in and explore your options for clean, watermark-free images.

Part 1. How to Remove a Watermark in Photoshop Using 6 Tools
Photoshop offers multiple ways to remove watermarks in photos, each with varying levels of control, precision, and ease of use.
In this section, we’ll explore six of the most effective tools in Photoshop that can help users remove watermarks from photos. From automatic correction tools like Spot Healing Brush and Content-Aware Fill, to more hands-on options like the Clone Stamp Tool and Patch Tool, each method serves a specific purpose depending on the complexity and background of your image.
You’ll also discover advanced tools like Generative Fill and the new Remove Tool, which leverage AI technology. Below is the step-by-step guide on how to remove a watermark in Photoshop:
Method 1. Using the Spot Healing Brush Tool
The Spot Healing Brush Tool in Photoshop is one of the go-to solutions for quickly and effortlessly removing watermarks. This tool is perfect for both beginners and pros. What this tool does is it intelligently blends surrounding pixels as you paint over the unwanted mark. Here’s how to remove a watermark in Photoshop using the Spot Healing Brush tool:
Step 1. In Photoshop, go to the File tab and choose Open to import the photo with the watermark you want to remove.
Step 2. Once the photo has loaded, select the Spot Healing Brush Tool from the left toolbar.
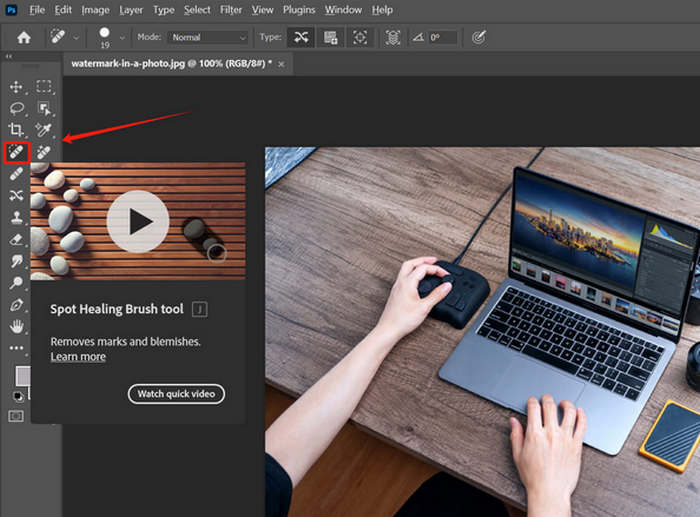
Step 3. Adjust the brush size in the top menu to slightly larger than the watermark. Gently paint over the watermark. Photoshop will automatically blend the area using surrounding pixels.
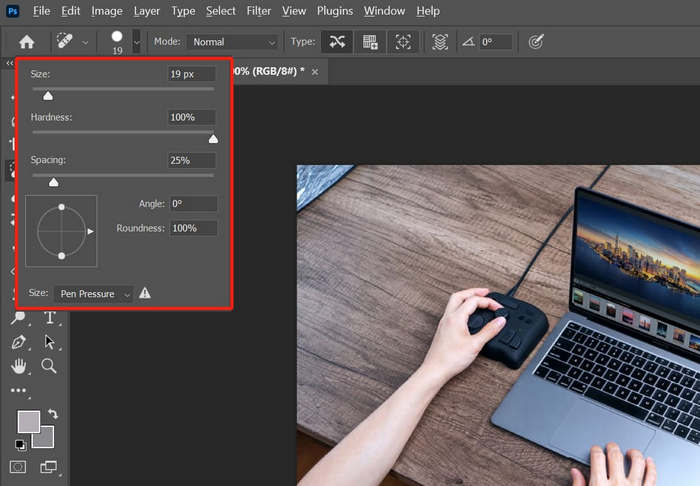
If the result looks unnatural, lower the brush hardness for a softer effect.
Method 2. Using the Clone Stamp Tool
For users seeking more control and precision, the Clone Stamp Tool is a classic favorite. This Photoshop tool allows users to manually sample a clean part of the image and clone it over the watermark area. While it may require a bit more time and skill, this method gives you complete authority over how the final result looks, making it a great method for removing a watermark for complex or patterned backgrounds. Here’s the step-by-step guide on how to remove a watermark in Photoshop using the Clone Stamp tool:
Assuming that you have already imported the photo that contains the watermark that you want to remove.
Step 1. Select the Clone Stamp Tool from the left toolbar.
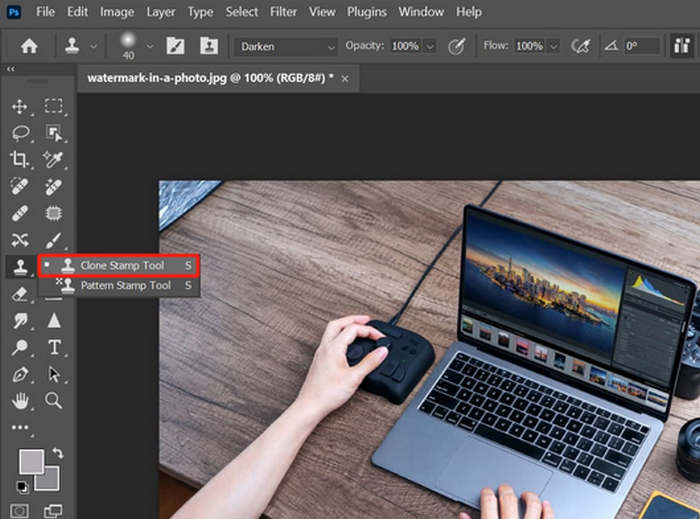
Step 2. Hold the Alt key and click on a clean area of the photo that is near the watermark.
Step 3. Release Alt and paint over the watermark.
Method 3. Using the Patch Tool
Another Photoshop watermark remover tool is the Patch. This tool blends the flexibility of selection with the precision of pixel replacement. Just draw around the watermark and drag the selection to a clean area you want to use as a replacement. It’s a great choice when working with larger or irregularly shaped watermarks, offering a balance between ease and control. Below is the guide on how to remove a watermark in Photoshop using the Patch tool:
Step 1. Select the Patch Tool from the Toolbar under the Healing Tools group.

Step 2. After that, draw a freehand selection around the watermark.

Step 3. Next, drag the selection to a clean nearby area that matches the texture. After that, release the mouse, and Photoshop will patch it.

If you’re unsure of the background, zoom in to check the blend, and repeat if needed.
Method 4. Using the Content-Aware Fill
The next method for removing watermarks in photos using Photoshop is the Content-Aware Fill. This method analyzes the surrounding areas to fill in the space left behind by the removed watermark. It works especially well with consistent backgrounds like skies, walls, or foliage. With adjustable settings and a live preview, it gives users the ability to fine-tune results for a seamless blend. Below are the detailed steps on how to remove a watermark in Photoshop using the Content-Aware Fill:
Step 1. Use a selection tool, such as the Rectangular Marquee Tool, to select the watermark.
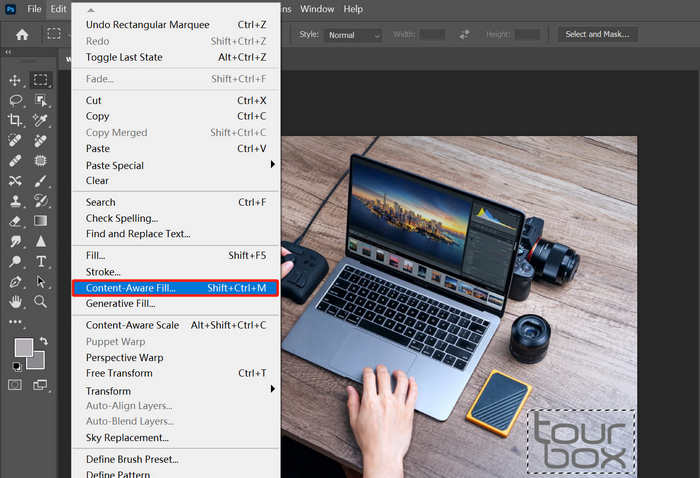
Step 2. Go to the Edit menu and Content-Aware Fill. A new panel will appear, and from there, you can preview and adjust the Sampling Area Options or Fill Settings as needed.
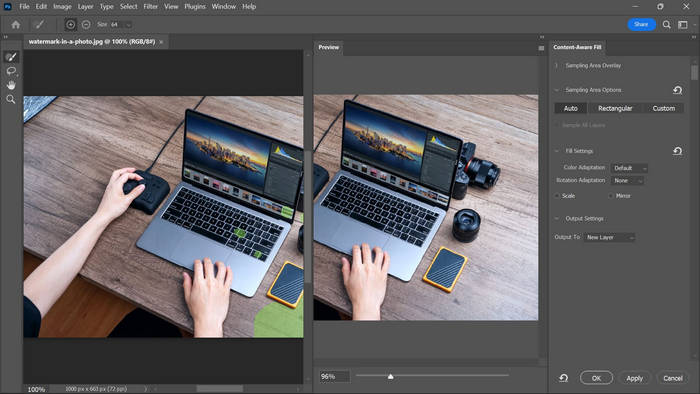
Step 3. Lastly, click OK to apply the changes.
If you want to undo the selections you’ve made, just click Ctrl+d or Command+d.
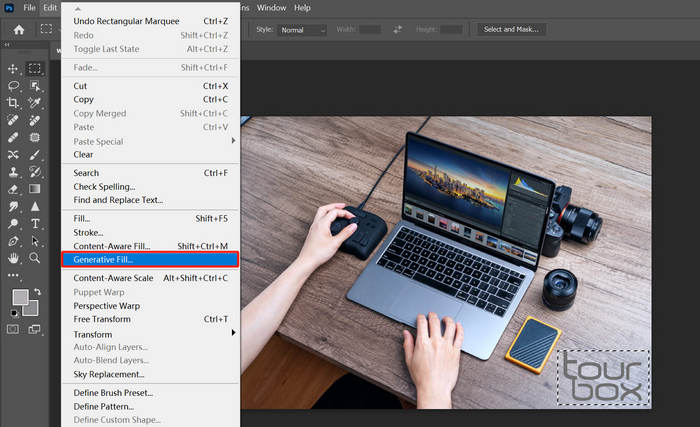
Method 5. Using the Generative Fill
When standard tools aren’t enough, Photoshop has an AI-powered tool that can also remove watermarks on photos, and that is the Generative Fill. This advanced method uses machine learning to intelligently reconstruct the area where the watermark once was, delivering the most natural and realistic results, even in detailed or textured environments. Below is the step-by-step guide on how to remove a watermark in Photoshop using its Generative Tool:
Step 1. First, open the image by dragging and dropping it onto the canvas.
Step 2. Use the color range or lasso tool to select the watermark.
Step 3. Then, go to the Window and navigate to the Contextual Taskbar.
Step 4. Now, click the Generative Fill button and let it generate.
Step 5. Wait a second. After generation, there are three options. Choose the desired output from these options.
Method 6. Using the Remove Tool
The Remove Tool in Photoshop is another powerful option for removing watermarks from your image. As the name implies, it's designed to easily erase unwanted elements. Just select the tool from the left-hand toolbar, adjust the brush size, and paint directly over the watermark. But for detailed steps on how to remove a watermark in Photoshop, check it below:
Step 1. Select the Remove Tool from the toolbar.
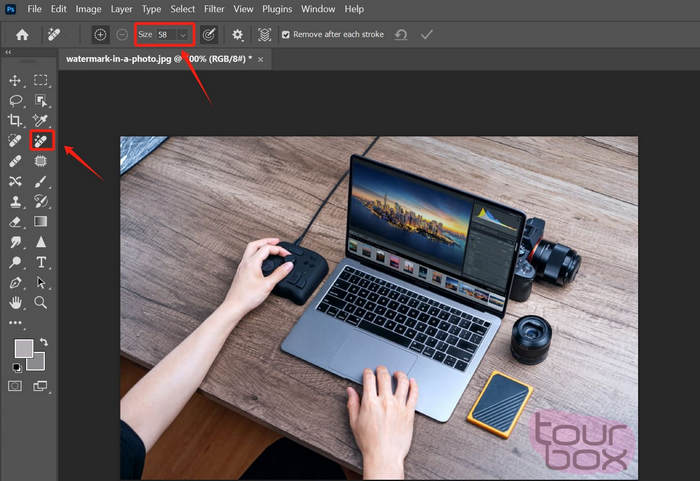
Step 2. After that, adjust the brush size as needed and paint over the watermark area.
Step 3. Release the mouse, and Photoshop will automatically remove and fill the area.
This method is not only quick and simple, but also effective for clearing away other distractions like people or objects in your photo.
Part 2. Photoshop Watermark Remover Alternative - Simplify the Task
Since Photoshop is a complex tool and might not be ideal for beginners, there’s an alternative tool that you can use that offers almost the same features as Photoshop, especially in terms of removing watermarks on photos. This tool is the FVC Free Watermark Remover. It is a web-based tool primarily known for its ability to remove watermarks from photos easily. FVC supports commonly used image formats such as JPG/JPEG. PNG, BMP, and more, allowing users to have versatility when removing watermarks from various images. Moreover, it provides flexible ways to select and erase watermarks. You can draw a polygonal outline, use a lasso tool, or brush over the watermark area. This makes it easy to adjust the selection according to the shape and size of the watermark
Main Features:
• Remove text, image, and logo watermarks from photos.
• Support JPG, JPEG, PNG, and BMP formats.
• Maintain the original image quality after removing the watermark.
• Use a brush, lasso, or polygonal outline to select the watermark area.
• Crop images before or after removing watermarks.
• Erase and reselect areas with the Eraser tool.
• Compatible with Windows and macOS.
Here’s the step-by-step guide on how to remove watermarks in Photoshop using FVC:
Step 1. First, you need to access the official website of the tool. Therefore, on your search engine, search for FVC Free Watermark Remover.
Step 2. Once found, click the Upload Image button to import the photo with the watermark you need to remove.
Step 3. Now, among the options above, choose what you prefer to remove the watermark from your photo. In this case, we used the Brush tool and brushed the watermark by moving the cursor in its direction. Once covered, click the Remove button above and click Save to download the photo.

When removing a watermark, choose a tool that matches the shape of the watermark. For small or uneven shapes, the Brush Tool works best. If the watermark has a curved or rounded design, the Lasso Tool is a better option. For straight-edged or angled shapes, the Polygonal Tool gives more precise control.
Part 3. FAQs about Removing Watermarks from Photos in Photoshop
Which Photoshop tool should I use for the best results when removing a watermark?
It depends on the shape and placement of the watermark. For small or simple marks, use the Spot Healing Brush. If you need more control, the Clone Stamp Tool or Patch Tool is ideal. For complex backgrounds, AI-powered tools like Generative Fill or the Remove Tool often produce more natural-looking results.
Is there an easier alternative to Photoshop for removing watermarks?
Yes, if you feel like you’re having a hard time using Photoshop to remove a watermark, you can try a simpler option like FVC Free Watermark Remover. It’s a web-based tool that lets you remove watermarks by brushing, outlining, or using a lasso around the mark, and then it will automatically remove the watermark.
How to remove water spots from pictures in Photoshop?
You can easily go to Image > Adjustments > Levels. In the Levels window, adjust the sliders to brighten the water spots and darken the surrounding areas, effectively isolating the spots.
Conclusion
To sum up, you can find some feasible features to help you remove watermark from photos in Photoshop. But each of them has limitations or is not so beginner-friendly. Thus, our recommended FVC Image Watermark Remover can be an easy, efficient, and user-friendly tool for all. Just try it!
-
 How to Crop in Photoshop: Beginner’s Guide [2025]
 Discover how to crop images in Photoshop with this easy-to-follow guide. Also, learn how to select areas, adjust aspect ratios, and more for photo cropping.
-
 How to Sharpen the Image in Photo Using 3 Ways [Quick Tutorial]
 Problem with the unsharpened image? Here, we will introduce how to sharpen images in Photoshop using the three ways we add.
-
 How to Add a Watermark in Photoshop [Beginner’s Guide]
 Want to know how to add a watermark to a video on Photoshop? In that case, this article will provide you with the thing or two you’ll need to know.