

Quick and Easy Fix– How to Crop Images in Photoshop
The complexity of using Photoshop for beginners is quite a challenge, and it has a lot of useful features that they must know about. Image cropping isn’t just a small thing. Learning it is crucial for improving composition, emphasizing subjects, adjusting aspect ratios, optimizing resolution, expressing creativity, enhancing storytelling, correcting mistakes, and adapting images for specific platforms. So, if you’re wondering how to crop images in Photoshop? You've landed in the right place. This guide is tailored to provide you with a step-by-step walkthrough on how to crop in Photoshop. Whether you're a beginner looking for a simple guide or someone eager to explore advanced techniques, we've got you covered. Let's transform your visuals and bring your creative ideas to life with the power of precise cropping in Photoshop.

Part 1. How to Crop Images in Photoshop?
Below is the step-by-step guide on how to crop images in Photoshop.
Step 1. Open Photoshop and import the image you want to crop by going to the File tab.

Step 2. Use the Crop Tool from the toolbar on the left.
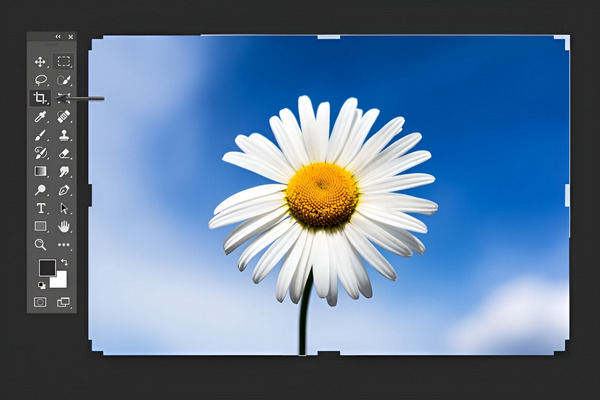
Step 3. Now draw a cropping area or drag the corner and edge handles to specify the crop boundaries in your photo, or else, at the top of the screen, you'll find options for the crop tool. Enter specific dimensions or aspect ratios if needed.

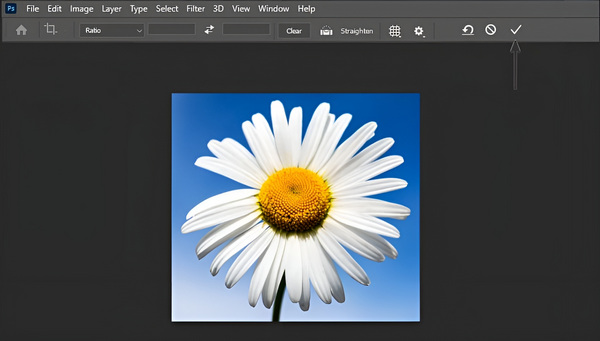
Step 4. If you have achieved your desired result, just click the Check button and save your cropped image by going to File and clicking the Save as option to save the cropped image.
Remember, Photoshop's cropping is non-destructive, so you can always go back and readjust the crop or revert to the original image. Simply select the crop tool again and modify it as needed. Also, Photoshop lets you resize and compress an image when you try to export it.
Part 2. Why is Crop Greyed Out in Photoshop? - Reasons and Solutions
The Crop tool in Photoshop might be greyed out for a few reasons. If you haven't picked a layer in the layers panel or if your image is a background layer, the Crop tool might stay inactive, and so forth. The table below shows the possible reasons why the crop is greyed out, as well as the possible solutions to fix them.
| Possible Reasons for Greyed-Out Crop Tool in Photoshop | Solutions |
| 1. No Active Layer | Ensure a layer is selected in the Layers panel to activate the Crop tool. |
| 2. Background Layer | To unlock cropping, double-click on the background layer and convert it into a regular layer. |
| 3. Text or Shape Layer Selected | For the Crop tool to function, choose a pixel-based layer instead of a text or shape layer. |
| 4. Locked Layer | Check and unlock the layer in the Layers panel to enable the Crop tool. |
| 5. Image is a Smart Object | To enable cropping, double-click on the smart object, make necessary changes, and save. |
| 6. Empty or Hidden Layer | Ensure the layer contains visible content and is not hidden to activate the Crop tool. |
| 7. Locked Background Layer in Certain Modes | Adjust the blending mode of the background layer to unlock the Crop tool. |
Part 3. Tips for Making an Image Smaller Without Cropping it Online
To make an image smaller without cropping it, you have to use an online image compressing tool or a resizer. One of the best image compressor tools that anyone can use today is the FVC Free Image Compressor. This tool is super user-friendly and designed to reduce the size of JPEG, PNG, SVG, and GIF images without compromising their quality. Moreover, this tool employs advanced optimization and compression algorithms to achieve the best compression ratio available.
Main Features:
Batch Compression: Users can compress multiple images simultaneously, with support for up to 40 images, each with a maximum size of 5MB. The tool ensures efficient compression without significant quality loss.
Automatic Compression: All uploaded photos undergo automatic compression, making the process fast and efficient. Users can simply upload, compress, and download their images without manual intervention.
Wide Compatibility: FVC Free Image Compressor supports various image formats, including JPEG, PNG, SVG, and GIF. The output format is PNG. Check this post to compress the GIF here.
No Account Required: Unlike some tools, FVC Free Image Compressor doesn't demand any registration, login, or account creation. It's a hassle-free, completely free-to-use tool without any hidden charges.
Privacy Protection: Users can trust that their uploaded images are protected. The tool ensures privacy by preventing unauthorized access to the uploaded pictures.
Customer Reviews: Users have praised the tool for its impressive compression speed, simplicity of interface, and effectiveness in reducing file sizes while maintaining image quality.
Step-by-Step Guide to Crop an Image Online:
Step 1. First, head on to their official website.
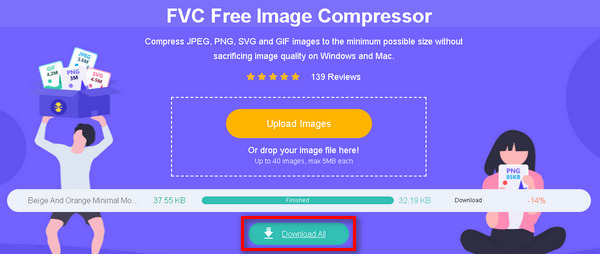
Step 2. Now, import your images by clicking the Upload Images button.

Step 3. Please wait until the repair process is complete. Once it's finished, you'll be notified with a status bar indicating the completion status and details on the new compressed image size. Press the Download button to save your image.
FVC Free Image Compressor is indeed a reliable solution for individuals seeking to optimize image sizes for various purposes, including increasing website speed, sharing images, and saving storage space. It stands out for its user-friendly interface, automatic compression, and commitment to maintaining high-quality output.
Part 4. FAQs about Cropping an Image in Photoshop
Where is the Crop Tool in Photoshop CC?
In Photoshop CC, you can find the Crop tool in the toolbar on the left side of the screen. It is represented by an icon that looks like a cropping frame. If you can't locate it, press the C key on your keyboard to activate the Crop tool.
How do I crop in Photoshop with the Quick Selection Tool?
The Quick Selection tool is primarily used for making selections, not cropping. To crop using this tool, follow these steps:
1. First, use the Quick Selection tool to make your desired selection.
2. After selecting, go to the Select menu and choose “Inverse” to invert the selection.
3. Press Ctrl + Shift + I for Windows) or Cmd + Shift + I for Mac to select the inverse.
4. Finally, go to the Image menu, choose Crop, and your image will be automatically cropped based on the selected area.
How do I cut and move a selection in Photoshop?
To cut and move a selection in Photoshop, use the following steps:
1. Make your selection using any selection tool e.g., Rectangular Marquee, Lasso.
2. Press Ctrl + X for Windows or Cmd + X for Mac to cut the selected area.
3. Move to the desired location in your image.
4. Press Ctrl + V for Windows or Cmd + V for Mac to paste the cut selection into the new location.
Can I crop multiple images at once in Photoshop?
Photoshop doesn't have a built-in feature to crop multiple images simultaneously. However, you can create an action to automate the cropping process for a batch of images. Record a cropping action on one image, then apply it to a folder of images using the Batch command under the File menu.
Is there a way to crop an image without losing the original resolution in Photoshop?
Yes, in Photoshop, you can use the Content-Aware Crop feature to extend the canvas while preserving the original resolution. This allows you to crop an image without permanently discarding any pixels, giving you the flexibility to readjust the crop later without loss of quality.
Conclusion
You are now equipped with the knowledge of how to crop in Photoshop. So, whether you're a beginner or a pro, this guide has you covered, from the basics to troubleshooting and a tip tool on resizing images without losing quality. Ready to unleash your creativity? Dive in and explore the potential of Photoshop.
-
 How to Crop MP4 File Without Losing Any Quality of the Video [2025]
 Learn how to Crop MP4 with easy steps provided just for you. So, keep up the pace because we present to you the best of the best cropping tools you may use.
-
 Step-by-Step Guide to Cut Out An Image in Photoshop
 Are you using Photoshop? This article might be for you. Learn how to cut out an image in Photoshop quickly and easily. Read it now and discover something.
-
 How to Remove Watermark from Photo in Photoshop [Steps]
 Photoshop is one of the popular editing tools. Get the free tutorial here using Photoshop to remove the watermark from photos. Also, discover alternative ways.