


How to Resize an Image on iPhone Using 3 Effective Ways [Free]
Not all of the images on the web you saved on your iPhone fit as wallpaper or home screens because of their aspect ratio and dimension. Sometimes when you use a photo with incorrect dimensions as wallpaper or home screen, it becomes blurry, and it has black sides instead of being fit to the screen. Troublesome right? Fortunately, you can download a photo resizer on Appstore, use Shortcut, or take advantage of the built-in picture editor on your reach. To resize a photo on your iPhone quickly, you can spend a few minutes reading this article to know it better and fix the size problem you have on your device.

Part 1. 3 Effective Ways on How to Resize an Image on iPhone [Downloadable & Built-in]
Using Shortcut [Built-in]

Shortcut allows its iOS users to create an extensive function that you can use, such as resizing the image you have on your local file. All of the iOS versions 13 and up do have a pre-installed app. Since the application's introduction is new, the old version doesn’t have an extensive app like this. But you can download it on the Appstore of your iPhone or iPad for free. To teach you how to resize an iPhone image using this, you can follow the steps we add below.
Step 1. Open the app on your iPhone, then tap the plus button at the top to add a shortcut to resizing your device.
Step 2. Tap the three line dots, then add the shortcut's name; for this shortcut, you can use the name Resizing Photo. Turn on the Show in Share Sheet so that whenever you want to share the image, it will automatically resize if you choose it.
Step 3. Deselect the Anything on the Share Sheet Type into Images only. Then hit Done to save the settings you created.
Step 4. Before you use this function, you will need to press the plus icon, Media, then press Resize Image. You can set the length according to your need and press Done to save it. Now, every time you share an image, you have the option to resize it automatically with this shortcut.
Using Photo App [Built-in]
Another built-in application you can freely use on iPhone on any version is the Photo App. Through the years of being a dependable image editor and enhancer of every iPhone user, it would be incomplete if we didn’t mention this app. Some know how this app works on resizing, and some don’t. So, to those users who don’t know how to resize a photo on iPhone, this tutorial can help you.
Step 1. Open the Photo App and tap the photo you want to resize.
Step 2. After selecting the image, you want to resize, tap the Edit.
Step 3. Tap the crop icon on the upper right corner, and tap the squares-like button.
Step 4. On it, there will be different presets of aspect ratio you can select, then tap Done to save the changes.
Using Image Size [Downloadable]
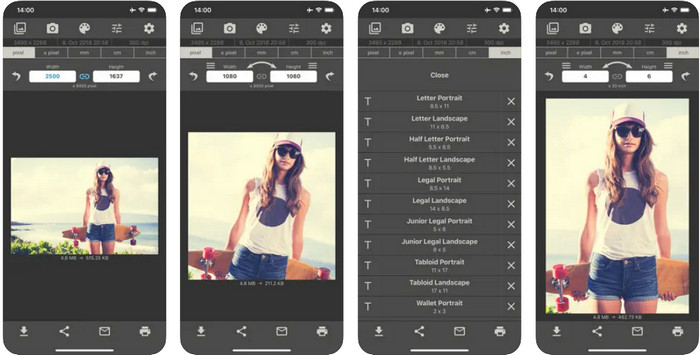
Image Size is a third-party app you can rely on and download on iOS to easily resize the photo for iPhone wallpaper. Unlike the two ways we introduce, you need to download this app on Appstore before using it. It is not a built-in app on iOS, but it is available on most iOS versions to be downloaded immediately. Since it is free to use and download, multiple popping ads appear when you use it. If you don’t mind the ads, you can proceed to the steps to use this photo resizer app on your iPhone.
Step 1. Install this photo resizer on your iOS, then open it.
Step 2. Tap the image icon to upload the image you want to be resized by this app.
Step 3. On the upper part, you will see that measurement is being set to the image; change that into your preferred height and length.
Step 4. Tap the download button to save the image you resize.
Part 2. Best Way to Resizing an Image Online Free from Ads or Installation Process
With FVC Free Image Upscaler, you can easily change every image's dimension automatically with an AI's help. You wouldn’t need long-term experience in resizing because it is achievable with this app. Millions of users use this app to resize, upscale, enhance, and improve the quality of their images at once. What makes this tool even better is that you can use this for free. Isn’t it amazing? Well, it is. An all-in-one editor is what this app offers for you. To help you resize your photo, follow the indicated steps and use this tool.
Step 1. You can open this web tool by clicking this link, and a new tab will appear on your display.
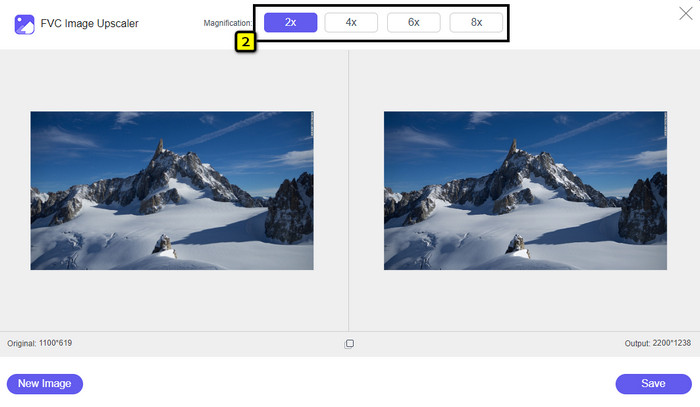
Step 2. To add the image you want to resize, click the Add Image. Search for the image on the file folder that will show on your screen and press Open to add it here.

Step 3. This app will load the image you upload and select the magnification you want to apply to your image. It will automatically resize the photo you have into a new dimension.
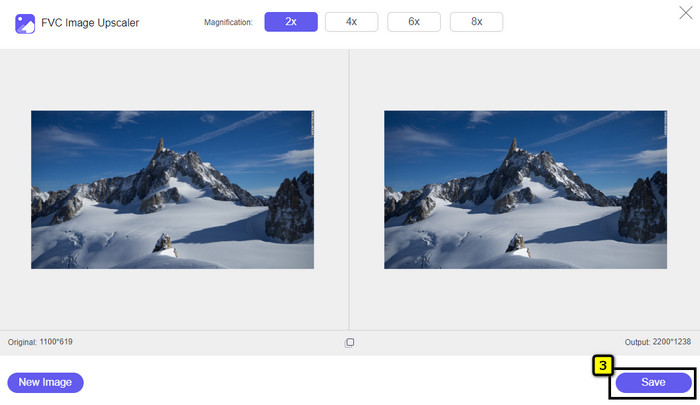
Step 4. When you are done tweaking the image, press Save to download the resized version on your local drive.
Part 3. FAQs on How to Resize the Image on iPhone
What is the perfect dimension to use as wallpaper on iPhone?
To the users of iPhone SE, 6, 6 plus, 7, 7 plus, 8, 8 plus, the standard dimension of the image to be used as a wallpaper must be anywhere between 1136 x 640 and 1920 x 1080 px. It is the standard length and height for the image you want to use as wallpaper on iPhone devices. But for those who use iPhone XR, 11, and 13, you can now use 828 x 1792 or as big as 3073 x 1420 px as display dimension.
What is the disadvantage of cropping instead of resizing images on the iPhone?
When you crop the image, you will see that it will cut out the dimension of it. Yes, the image size will change, but the overall look of it isn’t the same as resizing. While on resizing, you can freely change the height and length of an image without cutting down edges or some sort. So, if you want to use the photo as wallpaper and make it fit, you better resize it rather than cropping it on your iPhone.
Why did making the image bigger become blurry after resizing on iPhone?
Because these applications and ways we include in this article don’t create PPI, they stretch out the resized image on your iPhone. So, if you don’t like to experience this type of problem, then you must use the online tool we include here to create PPI when you resize the image on your iPhone.
Conclusion
You can rely on the tool we found on iPhone that could help you easily resize a photo on your iPhone. Even though you don’t download an app, you can use the built-in application saved on your device. If you want to be more specific, you can use and download the app we add. But if you want to resize your image without affecting the quality, use the online tool we add. Read part 2, for we add a tutorial on how to use it.
-
 5 of the Best GIF Resizers Available Across All Platforms [2022]
 Want to know the GIF resizers you can use? In that case, the information provided below will talk about the resizers you can use on your GIFs on all platforms.
-
 How to Resize Image – Adobe Resize Image [Online and Offline]
 If you are searching for Adobe resize image, then we have the solution for you. View this post thoroughly to learn how to resize images using Adobe on your PC.
-
 How to Resize Photo for Facebook [Quick and Easy Steps]
 If you are having trouble uploading a large-sized image on Facebook, we have a solution for you. Finish this article to learn how to resize photos for Facebook.