


How to Trim Video in QuickTime to Cut a Clip on Mac
Have you ever recorded a super cool gameplay clip, a Zoom lecture, or a heartfelt birthday message on your Mac, only to realize the first thirty seconds are just you awkwardly coughing or staring at the camera? No worry, and QuickTime is the solution.
QuickTime Player isn’t just for watching movies; it’s a surprisingly powerful (and free!) tool for basic edits. In this guide, you will learn how to trim video in QuickTime and find solutions to troubleshoot those annoying glitches. Let’s dive in!

Part 1. How to Trim Video in QuickTime
When I first learned how to trim video with QuickTime, I was surprised by how simple it was. You don't need to be a tech genius to master this. Whether you want to shorten a QuickTime video for an email or just cut videos on Mac to save storage space, here is exactly how I do it.
Step 1. Find the Trim feature
First things first, find the video you want to edit. Right click the file, then choose Open With and select QuickTime Player.

Once your video is open, look at the top menu bar. Navigate to Edit and then click on Trim.

I’m a huge fan of keyboard shortcuts because they make me feel like a hacker. You can simply press Command + T on your keyboard, and the trimming interface will appear instantly.
Step 2. Adjust the yellow handles
This is where the magic happens. Once you enter "Trim Mode," a yellow frame (the trim bar) will appear over the video timeline at the bottom of the window.
To trim a video in QuickTime Player, simply click and drag the left yellow handle to the desired start point. Then, drag the right yellow handle to the desired end point of the video.

For extra precision, click and hold the yellow handle. QuickTime will zoom in on the frames, allowing you to see exactly where a scene starts or ends. This is a lifesaver when you're trying to cut out a single awkward blink!
Step 3. Start cutting video
Once you’ve isolated the perfect part of your clip, click the Trim button on the right side of the timeline. Everything outside of those yellow bars will vanish. Don't worry, though, and you haven't lost the original file yet!

Step 4. Exporting your trimmed video
After you trim the video in QuickTime for Mac, you need to save it. Go to File > Save. Give your new, shorter clip a name. I usually add "-trimmed" to the end of the filename so I don't get it confused with the original long version.

If you want to change the quality (such as downgrading from 4K to 1080p to save space), you can go to File > Export As instead. This is how you effectively shorten a QuickTime video while keeping the file size small.
Part 2. Why is My Trim Button Grayed Out? (Reasons & Fixes)
There is nothing more frustrating than opening a file and realizing you can't trim a video in QuickTime because the button is grayed out. I’ve spent many late nights staring at a "grayed-out" screen, wondering what I did wrong. After some trial and error, I found the culprits.
If you’re asking, "Why can't I trim a video in QuickTime?" here are the most common reasons and how I fixed them:
Unsupported File Formats
QuickTime is somewhat demanding. It supports .mov and .mp4 files, but if you try to play an .mkv or an old .avi file, it might let you watch the video, but won't let you edit it.
The Fix: You’ll need to convert MKV to MP4, a Mac-friendly format first (we'll talk about a tool for that in a bit!).
Read-Only Files
Sometimes, if you've downloaded a file from the internet or a cloud drive, it might be "Locked" or set to "Read-Only."
The Fix: Right-click the file, select Get Info, and ensure the "Locked" checkbox is unchecked, as well as that your permissions are set to "Read & Write."
The File is Already Being Used
If another app is trying to access or upload that video, QuickTime might block editing to prevent file corruption.
The Fix: Close other apps, such as iMovie or your web browser, and try again.
macOS Glitches
Sometimes, your Mac just needs a nap.
The Fix: Restart QuickTime Player or, if all else fails, restart your Mac. It sounds cliché, but "turning it off and on again" fixes 90% of my tech problems. This fix will also work when QuickTime Player is not working.
Part 3. The Best Alternative to QuickTime for Video Trimming
While learning how to trim videos on QuickTime Player is great for quick edits, it definitely has its limits. For example, QuickTime can't handle multiple clips simultaneously, and its format support is relatively narrow. That’s when I turned to FVC Video Converter Ultimate. This software is a total powerhouse for Mac users who want more control over their video editing. It’s not just a converter; it’s a full-on video toolkit that allows you to trim, crop, merge, and enhance your videos with just a few clicks. Whether you're dealing with 4K footage or weird file types that QuickTime rejects, FVC handles it all without breaking a sweat.
If you’re ready to move beyond the basics of how to cut videos on Mac, here is how I use FVC to get the job done:
Free DownloadFor Windows 7 or laterSecure Download
Free DownloadFor MacOS 10.7 or laterSecure Download
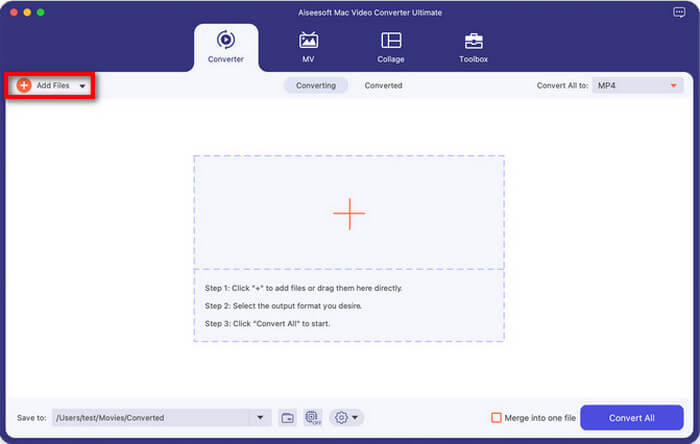
Step 1. Add your video
Open the program and click the large + button or Add Files to import your video. You can even drag and drop multiple videos at once if you're in a hurry.
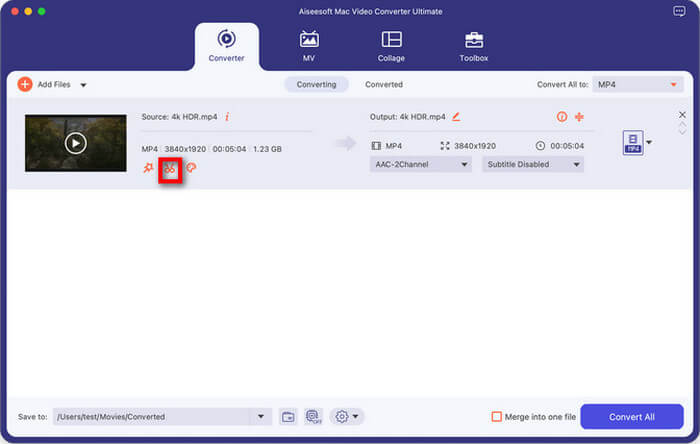
Step 2. Enter the Cut tool
Look for the Cut icon (represented by a pair of scissors) next to the video thumbnail. Click it to open the trimming window.
Step 3. Trim a video
Just as in QuickTime, you can move the sliders to choose where the clip starts and ends. However, FVC allows you to click Add Segment, which means you can cut multiple different parts out of one single video, something QuickTime can't do easily.
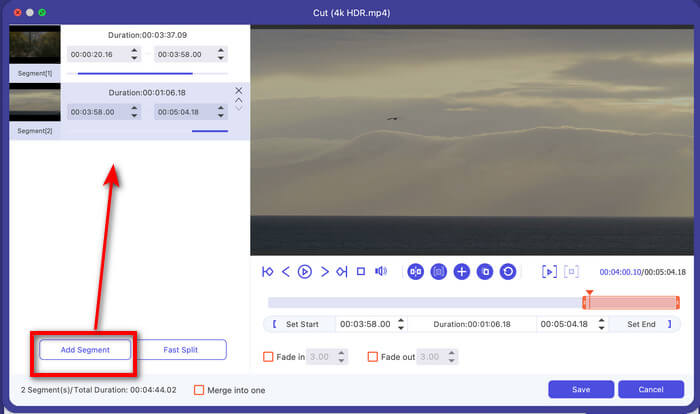
This tool also offers a fast split feature, which lets you cut a long video into several clips by average time or part.
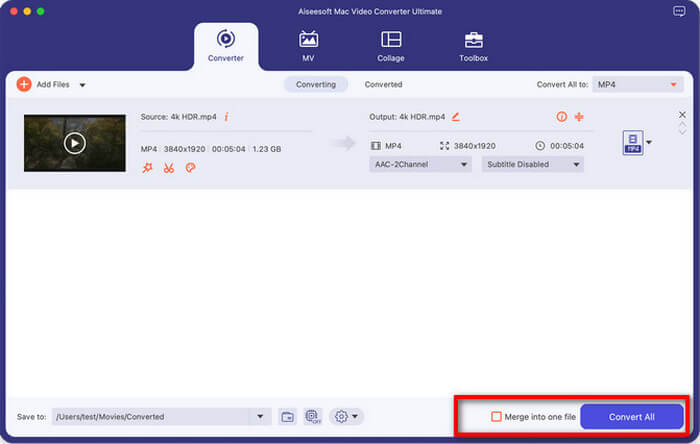
Step 4. Save and convert
Once you’re happy with your clips, click Save. Then, back in the main window, choose your output format (like MP4 or MOV) and hit Convert All.
If you want to combine your cut clips into one, just arrange the order and tick the checkbox of Merge into one file.
FVC Video Converter Ultimate is significantly faster than QuickTime when processing high-resolution files. I love that it doesn't crash when I try to edit large files, and the ability to "Fast Split" a long video into equal parts is a total game-changer for my social media posts. The only downside is that it is a third-party app, so you do have to download it, whereas QuickTime is already built into your Mac. However, for anyone who does more than just the occasional edit, the extra features are 100% worth it.
Part 4. FAQs
What video formats does QuickTime support for trimming?
QuickTime Player is most comfortable with Apple-native formats. It works best with MOV, MP4, M4V, and some AVI files (depending on the codec). If you find that trimming a video in QuickTime on Mac loses quality, it might be because the original format wasn't fully supported. If you have an MKV or FLV file, you’ll likely need to use a converter like FVC mentioned above before you can edit.
How to trim multiple parts of a video in QuickTime?
This is a "secret" feature! To cut out a middle section of a video:
1.Go to Edit > Split Clip (or hit Command + Y) at the point where you want to start the cut.
2.Move the playhead to the end of the part you want to remove and hit Command + Y again.
3.Now, your video is in three pieces. Click on the middle piece (it will be outlined in yellow) and press the Delete key on your keyboard.
4.Voila! You’ve just removed the middle of a video.
Where does QuickTime save trimmed videos?
By default, when you click "Trim," QuickTime keeps the edited version in its temporary memory. It becomes a permanent file only after you go to File > Save. At that point, a window will appear, asking you exactly where you want to place it. I usually save mine to the Desktop or Downloads folder so I don't lose them in my messy file system.
Conclusion
Learning how to trim video in QuickTime is a simple Mac skill that can save you a lot of time and hassle. Whether you're a student, a creator, or just someone trying to clean up their family vacation videos, QuickTime is a reliable, easy-to-use tool for the job. However, if you ever find yourself asking, "Why can't I trim a video in QuickTime?" or if you need to take on more advanced editing tasks, such as merging clips or converting formats, don't be afraid to try an alternative like FVC Video Converter Ultimate.
-
 Tips & Tricks about VLC Metadata Editor You Must Know in 2025
 Do you want to use the VLC as a metadata editor? In this case, you can read this article as we provide an unbiased review of the VLC metadata editor.
-
 VLC Playback Speed: Secret Techniques to Control the Video Speed
 Do you want to watch a video but change the VLC playback speed? We will teach you how to do it easily in both operating systems.
-
 How to Use VLC to Repair Videos | Your Ultimate Guide
 Do you have broken videos stuck on your files? Explore the ultimate guide to VLC video repair to repair your videos and get them playing again easily.