


How to Crop a Video in QuickTime: A Comprehensive Guide for Mac Users
Have you ever captured the perfect video of your friends doing something hilarious, only to realize later that there’s a giant pile of laundry or a random person photobombing the background? I’ve been there more times than I’d like to admit. Usually, our first instinct as Mac users is to double-click that file and open it in QuickTime Player. It’s fast, it’s built-in, and it’s right there. But then, the frustration hits. You look through the menus, searching for a Crop tool, and… nothing. You see Trim, you see Rotate, but the actual ability to cut out the edges of the frame seems to be missing.
However, do not worry; in this guide, we will discuss what’s possible, what isn’t, and how you can achieve that perfectly framed shot without needing a degree in film editing by showing you how to crop a video clip in QuickTime Player.
Are you ready to get this problem fixed? Continue reading!

Part 1. Can You Crop a Video in QuickTime
Let’s start with the truth, even if it’s a bit of a bummer. If you are using the standard, free version of QuickTime Player that comes pre-installed on every macOS, can you crop a video directly in QuickTime? The short answer is: No, not in the way you think.
The Why Behind the Limitation
Unlike the Photos app on your iPhone, which has a very intuitive crop tool, the desktop version of QuickTime Player is primarily designed as a player. Apple designed it to be a lightweight tool for viewing and performing basic edits, such as trimming (shortening the length) or rotating.
When people ask about cropping video in QuickTime, they usually expect a click and drag box to appear over the video. Unfortunately, that feature is not included in the standard menu. It’s one of those weird Mac quirks where the mobile version of their software is sometimes more feature-rich than the desktop version for quick edits.
If you are determined to stay within the QuickTime ecosystem, you have two main paths:
1. Upgrade to QuickTime Pro: (Note: This is an older solution and mostly applies to legacy systems, but it’s the official way the software used to handle this).
2. The Screen Recording workaround: This is my favorite hack. You can actually crop a video indirectly by using the QuickTime screen recording function to record only the specific part of the video you want to keep.
We’ll dive deep into both of these methods below, so you can choose the one that suits your style.
Part 2. How to Crop a Video in QuickTime on Mac
Since we’ve established that there isn't a Crop button, let's discuss the two ways to achieve the desired result using QuickTime's existing tools.
Method 1: Crop a Video by New Screen Recording
This is the most human way to do it without spending money or downloading complex software. Essentially, you are going to play your video and then re-record the screen, but only selecting the portion of the frame you want to keep.
Step 1. Open your video
Launch QuickTime Player and open the file you want to edit. QuickTime supports MOV, MP4, M4V, etc., and you can import the video file into this tool for cropping (QuickTime cannot open MOV?).
Step 2. Set the stage
Pause the video at a frame that shows the full area you want to keep. Make the window as large as possible to maintain high quality.
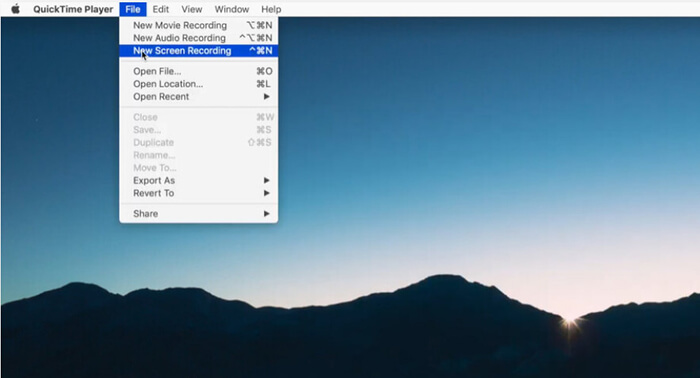
Step 3. Start a New Screen Recording
Go to File > New Screen Recording (or press Command + Shift + 5).
Step 4. Select the area
In the recording toolbar that appears, select Record Selected Portion. You will see a dashed box appear. Drag the corners of this box so it perfectly fits the area of the video you want to crop to.
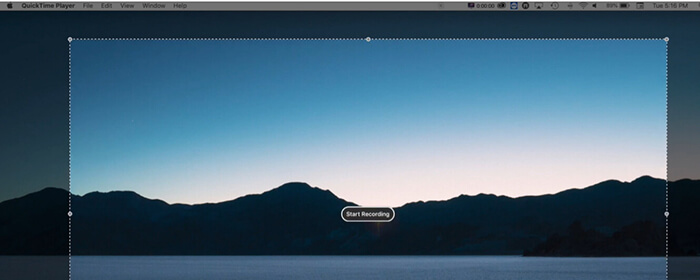
Step 5. Record and play
Click Record. Then, immediately hit play on your video. Let it run until the end.
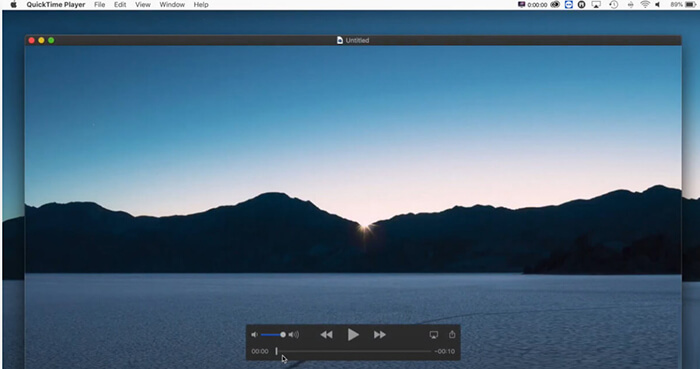
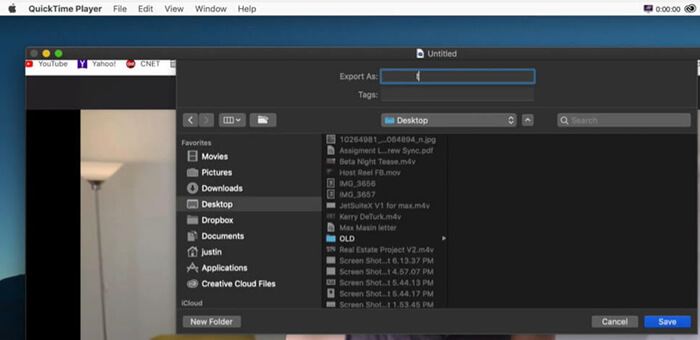
Step 6. Save cropped video file
Once the video is done, stop the recording. You can get a cropped video file.
Method 2: Using QuickTime Pro 7 (Legacy Method)
For those who have been using Macs since the mid-2000s, you might remember QuickTime Pro. While Apple has moved toward QuickTime Player, the Pro version allowed you to use a Mask to crop videos.
Step 1. Create a Mask
You’d have to create a black-and-white image in a program like Photoshop or Preview that matches the dimensions of your video, with a white box representing the area you want to keep.

Step 2. Apply the Mask
In QuickTime Pro, you’d go to Windows > Show Movie Properties > Visual Settings and import that mask.
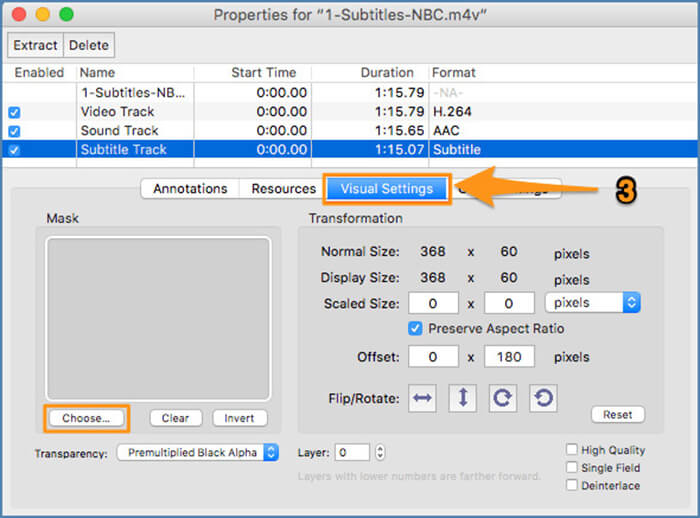
Step 3. Save cropped video
After that you can export and save the cropped video by clicking File > Export.

This is extremely tedious and, frankly, outdated. Most modern macOS versions no longer support QuickTime 7. I only mention it because you’ll see it in old forums, but I wouldn't recommend it for a quick high school project.
Part 3. Best Alternative to QuickTime for Cropping a Video on Mac
Let’s be real: the Screen Recording hack is fine for a 10-second clip, but if you have a 10-minute video, it’s a total nightmare. Plus, you lose a little bit of quality every time you re-record the screen. If you want to know how to crop a video in QuickTime Player without the headache, the best answer is actually to use a dedicated tool.
My top recommendation after testing a dozen different apps is FVC Video Converter Ultimate.
It is a powerhouse that feels like it was designed for people who find professional editors like Adobe Premiere way too intimidating. It’s a one-stop shop that handles conversion, compression, and most importantly, precise cropping with just a few clicks. Unlike the QuickTime workaround, this tool allows you to enter exact aspect ratios (such as 16:9 for YouTube or 9:16 for TikTok), ensuring your video appears professional and fits perfectly on any screen it's intended for. It also utilizes hardware acceleration, meaning it crops and saves your video significantly faster than most other apps I’ve tried. If you are tired of the limitations of built-in Mac tools, this is the logical next step for any student or content creator.
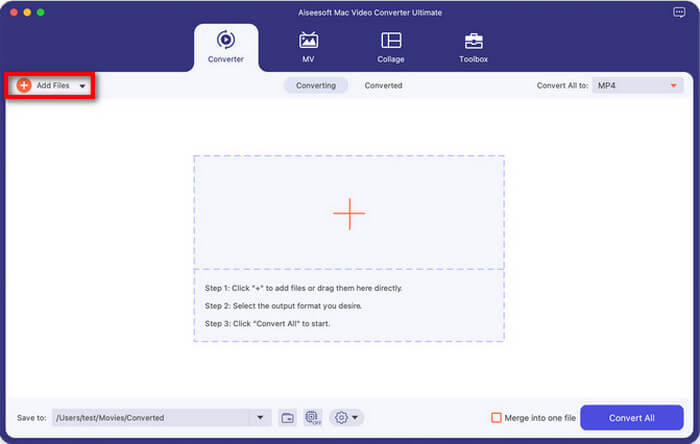
Step 1. Add your video
Free download FVC Video Converter Ultimate on your Mac. Open it up, and you’ll see a super clean interface.
Free DownloadFor Windows 7 or laterSecure Download
Free DownloadFor MacOS 10.7 or laterSecure Download
Click the large + button in the middle, or drag and drop your video file that you want to crop directly into the software.
Step 2. Crop the video file
Click on the Edit icon (which resembles a small magic wand or a star) located next to the video thumbnail.
Go to the Rotate & Crop tab. Here, you can simply grab the yellow corners of the frame and drag them to crop the video. Or, if you’re like me and want things to be perfect, use the Aspect Ratio dropdown to select a preset.
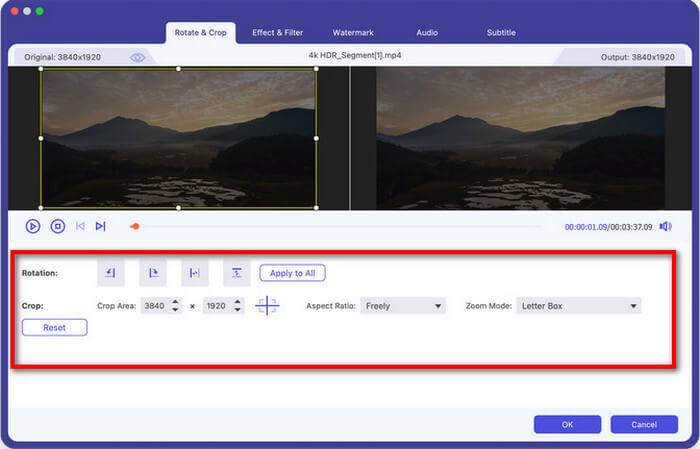
Step 3. Preview and save
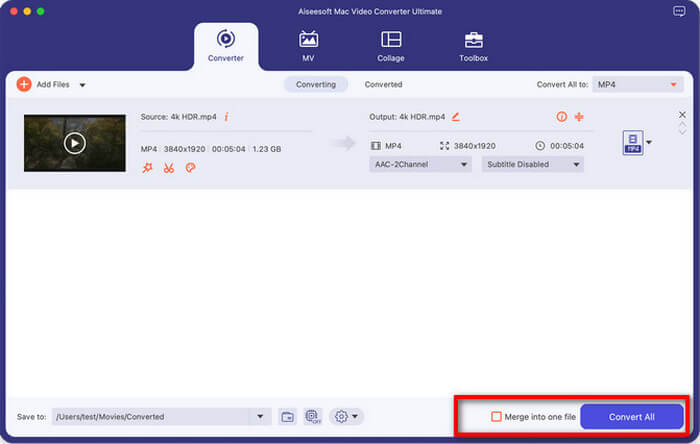
You can see a real-time preview of how the cropped video looks. Once you’re happy, click OK. Then, return to the main window and click Convert All to save your new, perfectly cropped masterpiece.
This video cropper is a lifesaver because it doesn't make me do math to figure out video dimensions. I love that I can crop a video for my Instagram story and then immediately convert it to a different format if needed. The biggest plus is the quality retention; it looks way sharper than the QuickTime screen recording method.
Part 4. FAQs
What is the difference between Trim and Crop in QuickTime?
This is the most common point of confusion!
• Trimming is about time. It’s like using a pair of scissors to cut the beginning or the end of a film strip. You are making the video shorter.
• Cropping is about space. It’s like taking a photo and cutting off the edges with a craft knife. You are changing what is visible within the frame. QuickTime Player excels at trimming, but it lacks a dedicated tool for cropping.
How to trim a video in QuickTime?
If you realized you actually just wanted to make the video shorter, here’s the quick way to do it:
1. Open the video in QuickTime.
2. Press Command + T or go to Edit > Trim.
3. Drag the yellow handles to choose the part of the video you want to keep.
4. Click Trim and save your file.
Why is my cropped video blurry?
If you used the Screen Recording method to crop a video in QuickTime Player, it may appear slightly blurry. This happens because you are essentially taking a picture of a picture.
• The Fix: Make sure your original video is playing at Actual Size or Fit to Screen (Command + 3) before you start recording. If the window is small, the recording will be low resolution.
• Better Fix: Use a tool like FVC Video Converter Ultimate, which crops the actual data of the video rather than just recording pixels on your screen.
Can I crop a video for free on a Mac without needing to download any additional software?
Technically, yes! If QuickTime seems too challenging, you can use iMovie instead. It comes free on your Mac. You just import the clip, click the Crop button above the preview window, and then export it. It’s a bit more heavyweight than QuickTime, but it’s a solid middle ground.
Conclusion
Learning how to crop a video in QuickTime feels a bit like a scavenger hunt. It’s not as straightforward as we’d like it to be, but with a little creativity and the right alternative software, it’s totally doable.
To recap:
- Standard QuickTime Player can’t crop directly.
- You can fake it by using the Screen Recording tool to capture a specific area of your screen.
- If you want a professional result without the hacky feel, FVC Video Converter Ultimate is the way to go.
Always keep a copy of your original, unedited video. There’s nothing worse than cropping a video, saving over the original, and then realizing you cut out something important!
Go ahead and give that video a haircut.
-
 Top Facts You Should Know about QuickTime Slow Motion
 Have you tried using QuickTime Media Player to play video in slow-motion? Read this article to know more about the excellent service this media player has.
-
 Best Way to Speed Up Video in QuickTime at Ease on Mac
 Need to speed up the video in Quicktime? Well, all the things you will need is in this article, so keep on reading it to know more about it.
-
 3 Easy Ways to Convert MP4 Files to QuickTime (MOV)
 Learn how to convert MP4 to QuickTime (MOV) using our simplified step-by-step guide, which will make your video conversion experience hassle-free and quick.