


How to Remove the Watermark from Origin Graph Effectively on the Graph
You might need to use the Origin Graph to create a template on mathematical or scientific data that is too complicated to put into words. This software has already helped students, researchers, professors, people in business, and others who need to make a graph of their own. With its set of templates you can choose from, you can make an eye-appealing graph that could catch the viewers' attention. The problem you might likely encounter if you use its free version is that it adds a text watermark on the final output. Are you in trouble handling the watermark? Say no more! Because we got you covered. Here, we will present helpful tips on removing the watermark from Origin Graph and then use it on your Word or PowerPoint presentation.

Part 1. How to Remove Watermark from Origin Graph with the Online Image Watermark Remover
FVC Free Watermark Remover Online is a top-notch text watermark remover you can use to eliminate the Origin Graph watermark. This tool is the most efficient in removing any object on your images to make them look even more professional once you remove the watermark. With it, we can assure you that it is a dedicated watermark remover you can use and depend on in times of this problem. Are you wondering if this tool is easy to use? Say no more! Because the steps we add below are the steps, you can follow to get rid of the text watermark on the image the Origin Graph adds.
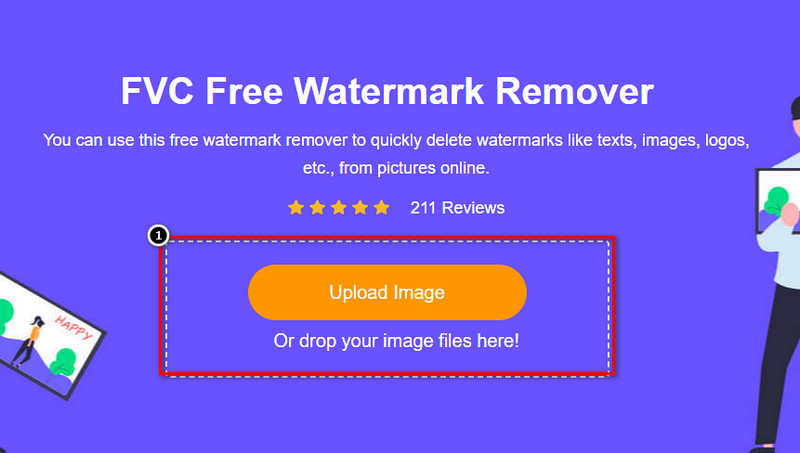
Step 1. You can click this link to open the image watermark remover online; it will directly open a new tab where you can access the tool.
Step 2. Press Upload Image to add the photo with a watermark here, locate the photo file on the folder, and click Open to upload it successfully.
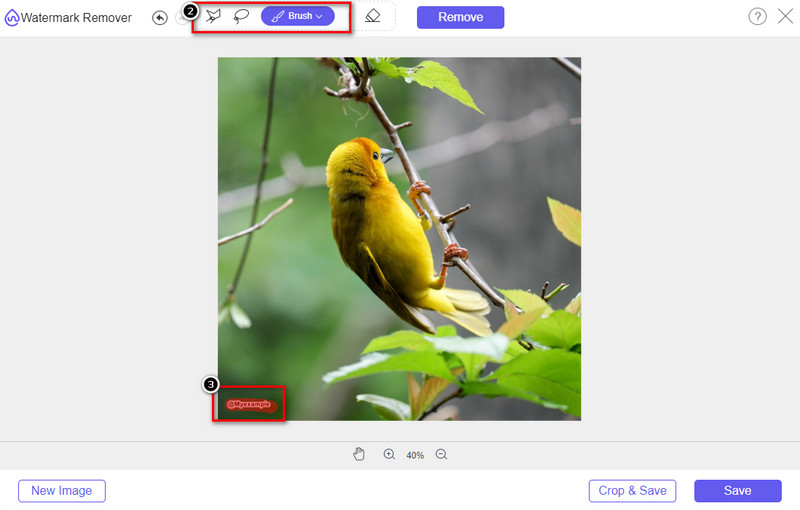
Step 3. You can use three tools to highlight the watermark; though they function differently, their effectiveness is the same. Choose one tool, then highlight the area of the image that has a watermark on it.
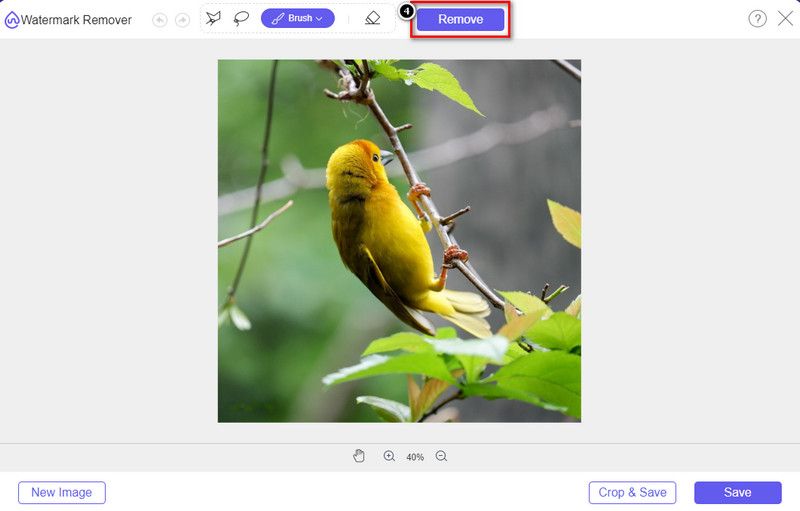
Step 4. Ensure to click the Remove icon after highlighting the tool's watermark. This step is essential so that when you export the image, you will have it without the watermark.
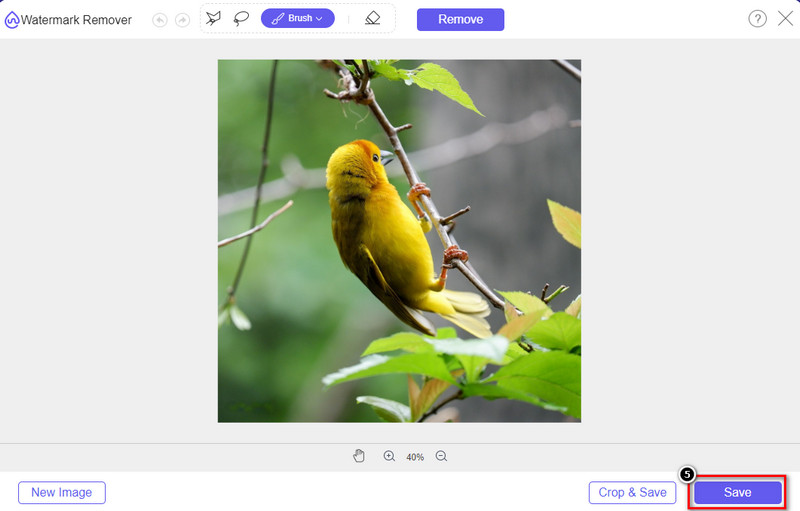
Step 5. To start the exporting process, you may now click the Save button. Wait for the process, and you can now check out the image without the watermark of Origin Graph visible on the area.
Pros
- A free web-based image watermark remover you can access on.
- It works efficiently on removing the watermark with AI-Technology support.
- It supports a wide variety of image formats you may have on your local drive.
- No watermark is added on exported images.
Cons
- Need internet connectivity to function.
- Its focus is on removing the watermark and nothing else.
Part 2. How to Copy Graphs from Origin to Word or PowerPoint without the Watermark
In this part of the article, we will give you the procedure you will need to know to add the graph you've created on Origin Graph without the watermark. Follow it accordingly to add the graph successfully you make on Microsoft Word and PowerPoint with no watermark.
You will need to free up at least 1.9GB because of its enormous file size. In the 1.9GB file, you can have the help you need, but if you don't want help, you can download the 652 MB version of it through .zip or .exe.
Steps on How to Create a Graph on Origin Graph without the Watermark:
Step 1. First, download the Origin Graph on your operating system by going to its official website. Open the tool to start creating the graph you want.
Step 2. After launching the software, add the value of the table you need. You can add more variables and that number of graphs here.
Additional: You can click the Plot to see other graphs you can use, like Basic 2D, Bar, Statistical, and more.
Step 3. Click File, then press Save to export the graph you've created here.
Step 4. You can follow the steps we add in Part 1 and follow the tutorial on removing the watermark from Origin Graph with the help of FVC Free Watermark Remover Online.
How to Use the Graph on Word without Watermark:
Step 1. Open the Word app on your desktop, then click Blank Page. If you've already created word docs, then open that File.
Step 2. Go to the Insert section, then click Pictures. Search over the graph file on your local drive, click it once, then press Open to upload it on Word.
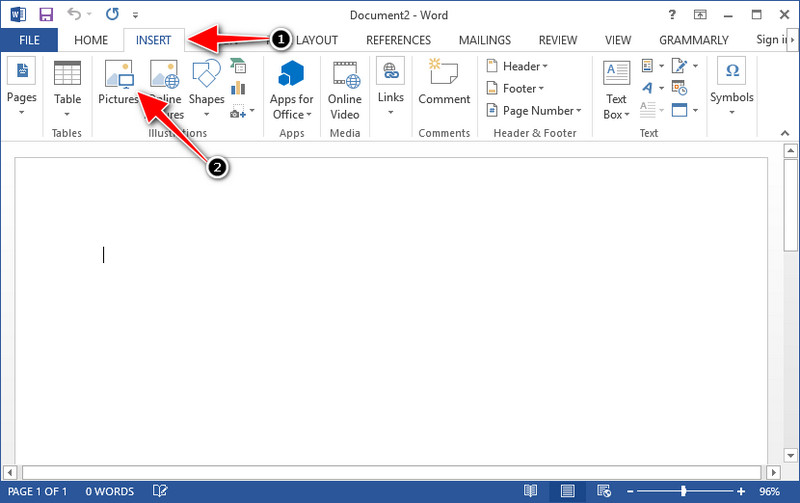
Step 3. It will load automatically on the Word docs you open or created; you can now place the graph by holding and dragging it on the Word.
How to Use the Graph on Powerpoint without Watermark:
Step 1. Launch the PowerPoint on your computer and click Blank Presentation. You can also check out the recent presentation you've created on the left side. If there is the File you need to add the graph, click it to open.
Step 2. Press Insert and click Picture to insert the image graph you've created on Origin Graph.

Step 3. Adjust the graph image and place them on the slide.
Further Reading:
How to Remove B612 Watermark from Your Images
How to Remove the WOW Slider Watermark for Free
Part 3. FAQs on How to Remove Watermark from Origin Graph
How much is the Origin Pro?
For the individual users, you can get the premium version of Origin Graph for $435 starting. You can visit its official store on Origin Lab.
Where can I officially download the Origin Graph?
Visit the Origin Lab to download the Origin Graph. Before you can download the software on your desktop, it will ask questions. After that, there will be two options to download the file, if you want to download it with help or not, in the form of .exe or zip.
Are Excel and Origin the same?
Excel and Origin have a spreadsheet-like GUI for arranging the data, calculating, and defining labels. However, Excel does focus on containing many columns and rows you can use. But with Origin, it is for arranging attributes that use a column formula rather than a cell formula like what Excel supports.
Conclusion
Now that you have learned how to remove the watermark from Origin Graph, it is your time to use the graph you've created and present it professionally. If your purpose is to use it on Word or Powerpoint, you can read Part 2 to learn how to do it. Removing the watermark with this tool is by far the most highly wanted by anyone who wants to remove the watermark on images. The problem is solved with this tool. If this article did help you, kindly leave a 5-stars below.
-
 How to Remove Watermark with Pixlr in Detailed Steps [Effective]
 Want to know how to remove a watermark with Pixlr? If so, continue reading below to know how to do it and the alternatives you can use.
-
 Remove Animotica Watermark on Exported Videos with 3 Proven Ways
 Have you ever wondered if it is possible to remove the Animotica watermark on videos you exported? This article provides a how-to-do.
-
 Free Ways to Remove the VideoShop Watermark on Videos [Effortlessly]
 To remove the VideoShop watermark, your device will need a watermark remover. To know what these are, read this article.